Jack up the gearbox, being careful not to damage the oil sump.
Attach the gearbox to the engine. Screw in and tighten the bolts on the gearbox flange. These bolts are screwed into the engine flywheel housing.
Raise the engine together with the gearbox and lower it, and also move the hoist that supported the gearbox from below.
Tighten the bracket-to-body bolts. Screw the bracket to the gearbox housing beforehand.
Install axle shafts with new expansion rings required for axial installation of axle shafts. Insert the tips of the axle shafts so deep into the hubs of the crown wheels that the expanding rings are unclenched.
The rest of the steps should be performed in the reverse order of removing the gearbox.
Adjustment of automatic transmission control should be carried out using the following instructions.
Place the hand control lever inside the vehicle in the parking position "R".
Tighten the handbrake.
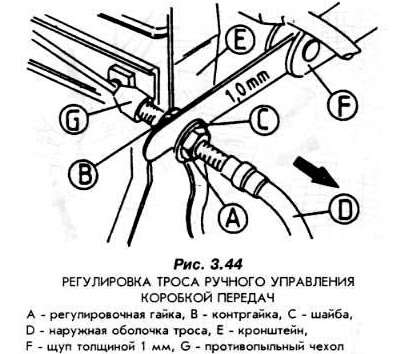
Check the freedom of movement of the cable in its sheath (pic. 3.44).

Press the gas pedal all the way down.
Loosen locknut (B, fig. 3.44) on the bracket and turn a few times.
Note: the adjusting nut must not be unscrewed (Ah, fig. 3.44).
Remove the outer sheath of the cable (D, fig. 3.44) from below.
Remove the dust cover (G, fig. 3.44).
Insert a 1 mm feeler gauge between the bracket and the mounting nut. Slightly screw the adjusting nut onto the feeler gauge to compensate for the gap, and remove the feeler gauge. Tighten the lock nut to 4.5 Nm, but be careful not to eliminate the 1 mm gap.
Install the sheath and dust cover onto the cable.
Connect the battery to the car's electrical network.
Fill the gearbox with oil.
Visitor comments