- difficult engine start;
- unstable engine operation;
- stop the engine at idle;
- increased idle speed of the crankshaft;
- the engine does not develop full power, insufficient engine acceleration;
- jerks and failures in the operation of the engine when the car is moving;
- increased fuel consumption;
- increased content of CO and CH in the exhaust gases;
- glow ignition due to a violation of the tightness of the nozzles.
You will need an autotester.
1. Remove the fuel rail (cm. «Removal and installation of the fuel rail»).

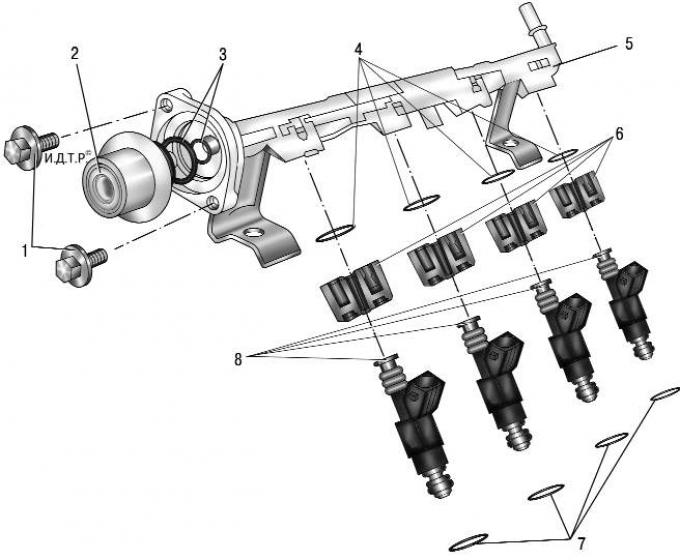
Pic. 5.26. Fuel rail with injectors and fuel pressure pulsation compensator: 1 – bolts for fastening the fuel pressure pulsation compensator; 2 – fuel pressure pulsation compensator; 3 - sealing rings of the fuel pressure pulsation compensator; 4 – top sealing rings of injectors; 5 - fuel rail; 6 - nozzle clamps; 7 - lower sealing rings of injectors; 8 - nozzles
2. Remove nozzles 8 (see fig. 5.26) from the holes of the fuel rail 5.
3. Check the resistance of the injector winding by connecting the probes of the autotester to the winding terminals. The resistance of a good injector should be 12–13 ohms. If the winding resistance is not correct, replace the injector, as it is beyond repair.
GOOD ADVICE: To some degree of accuracy, the operation of the nozzle can be checked by applying power to it from the battery using two pieces of insulated wire. A distinct click should be heard at the moment of connecting the wires.
NOTE: Check the nozzle for the shape of the sprayed fuel jet and for leaks at specialized service stations, since such a check directly on the car is very fire hazardous. With some degree of accuracy, you can check the tightness of the nozzle by lowering its atomizer into a container with kerosene and supplying compressed air at a pressure of 3 bar to the nozzle nozzle. At a serviceable nozzle, air should not escape through the atomizer.
4. Every time you remove the injectors, be sure to replace the top 4 (see fig. 5.26) and bottom 7 o-rings.
5. If you are installing the old injectors, carefully wash their nozzles with solvent or carburetor cleaner.
WARNING: It is not allowed to wash the nozzles by dipping into a detergent composition in order to avoid damage to their electrical part.
6. Install the nozzles in the reverse order of removal. Lubricate the O-rings with engine oil before installing the injectors.
7. Install the injectors in the fuel rail, and the rail on the intake pipe, connect the pipeline to the rail, start the engine and check the tightness of the pipeline and nozzle seals.
Visitor comments