Attention: Before replacing the light bulb, switch off the relevant consumer at the switch.
Main headlight
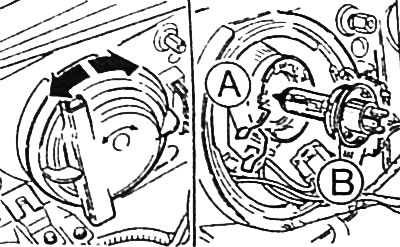
Open the engine compartment hood. At the back of the headlight, turn to the left and remove the plastic cover.
Disconnect the multi-pin connector for the headlight bulb. Press and fold out both wire spring clips -A-.
Remove bulb -B-.
Insert a new incandescent lamp so that the protrusions on the lamp frame fit into the corresponding grooves of the reflector.
Attention: When doing this, take the lamp not by the glass, but only by the frame.
Secure the lamp with wire spring clips. Connect the plug connector of the lamp socket.
Attach and turn to the right to secure the plastic cover.
Check headlight adjustment.
Additional high beam headlight
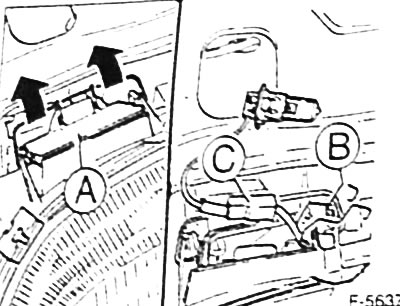
Open the engine compartment hood. Fold back the wire spring clip and remove the cover -A- from the upper side of the headlight.
Remove and fold out both wire spring clips -B-.
Take out the incandescent lamp.
Disconnect plug -C- from bulb.
Connect the plug to the new lamp.
Insert a new incandescent lamp so that the protrusions on the reflector fit into the corresponding grooves of the lamp socket.
Attention: When doing this, take the lamp not by the glass, but only by the frame.
Secure the lamp with wire spring clips.
Attach and secure the plastic cover with a wire spring clip.
Check the headlight adjustment at the service station.
Anti-fog headlight
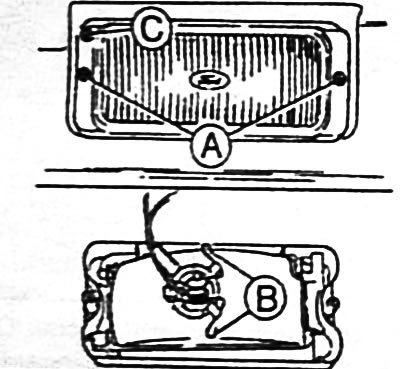
Unscrew cross-head bulbs -A- and remove fog lamp assembly. C - adjusting screw.
Compress and fold back the spring wire clip -B- from the back of the reflector.
Remove headlight bulb.
Disconnect the plug.
Connect the plug of the new lamp.
Insert a new incandescent lamp so that the protrusions on the reflector fit into the corresponding grooves of the lamp socket.
Attention: When doing this, take the lamp not by the glass, but only by the frame.
Secure the lamp with wire spring clamps.
Position the fog lamp and secure it with the Phillips screws on the head.
Check the headlight adjustment at the service station.
Front parking lights
Open the engine compartment hood.
At the back of the headlight, turn to the left and remove the plastic cover.
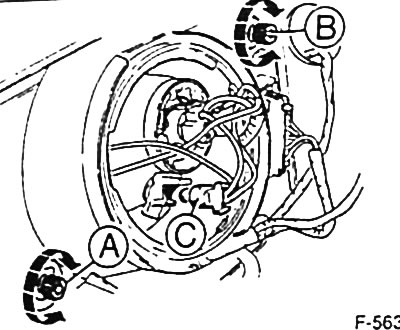
Remove holder -C- together with bulb from reflector. -A and B-: headlight adjustment screws.
Remove the dripping lamp from the holder.
Attention: The lamp is inserted, not screwed in.
Insert a new bulb into the holder.
Insert the holder with the incandescent lamp into the reflector.
Attach and turn to the right to secure the plastic cover.
Front turn signal light
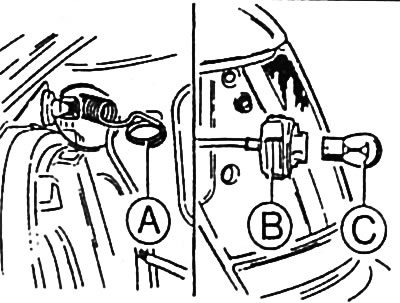
Open the engine compartment hood. Unclip spring clip -A- for turn signal light and pull out the light from the outside. The spring clip is located in the engine compartment on the side of the headlight.
Turn the bulb holder -B- of the indicator light to the left and pull it out of the light.
It is easy to push the bulb -C- of the direction indicator light into the holder, turn it to the left and remove it.
Insert a new bulb into the socket and fix it by turning to the right.
Insert the bulb socket into the reflector and lock it by turning to the right.
Insert the direction indicator lamp into the fender and hang a spring clip on it from the side of the engine compartment.
Side turn signal lamp
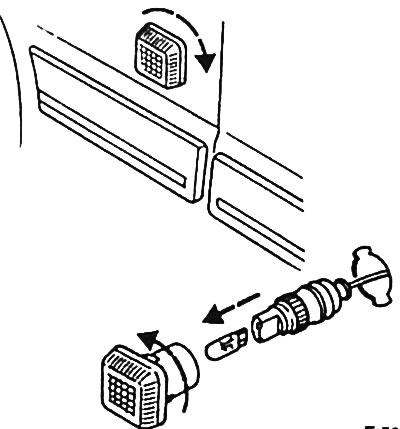
Turn the lamp housing assembly to the right and pull it out.
Turn the lamp housing to the left relative to the cartridge and disconnect from the cartridge.
Remove the bulb from the holder.
Attention: The lamp is inserted, not screwed in.
Insert a new incandescent lamp into the holder.
Slide the lamp housing onto the lamp holder and lock it by turning to the right.
Insert the lamp housing assembly into the wing, turn to the left and fix.
Back light
Vehicles with a gently sloping rear end, vehicles with a pronounced angle between the rear window and the luggage compartment.
Open the luggage compartment lid.
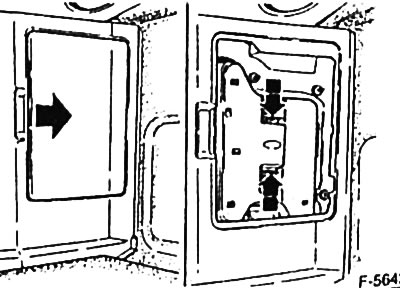
Remove the light cover from the luggage compartment.
Press together both latches -arrows- and remove bulb holder. To remove the right bulb holder, on some models, you must first remove the onboard jack.
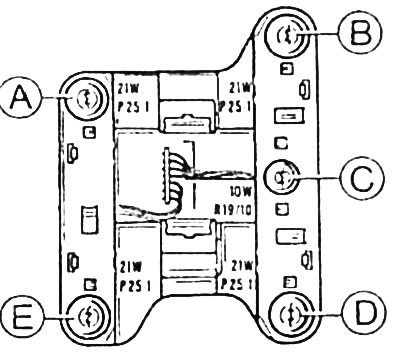
It is easy to press the defective lamp into the socket, turn to the left, remove and insert a new incandescent lamp. A - turn signal lamp, B - brake signal lamp, C - position lamp, D - fog lamp, E - reversing lamp.
Insert the lamp holder into the lamp housing and fix it. Attach and fix the cover of the lamp on the side of the luggage compartment.
Rear light TURNER
Open back door.
Remove the light cover from the luggage compartment.
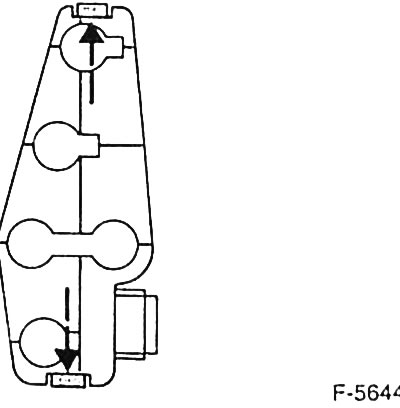
Press both latches -arrows- up and down and remove bulb holder.
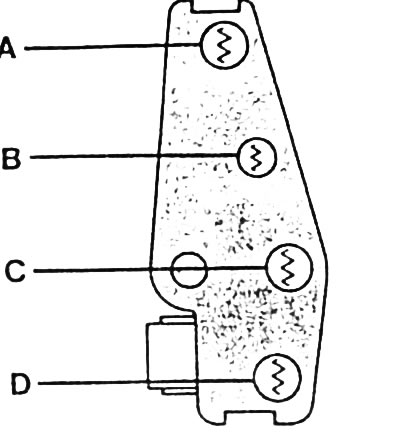
It is easy to press the defective lamp into the socket, turn to the left, remove and insert a new incandescent lamp. A - brake signal lamp, B - side light lamp, C - direction indicator lamp, D - fog lamp.
Insert the lamp holder into the lamp housing and fix it. Attach and fix the cover of the lamp on the side of the luggage compartment.
Reversing lamp TURNER
Open back door.
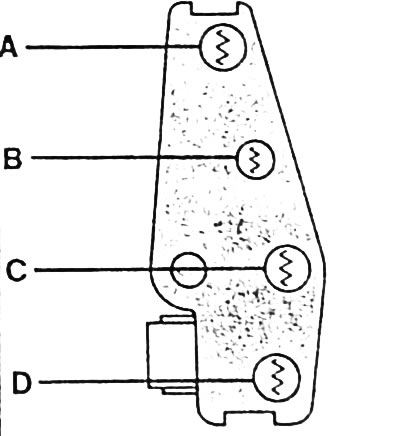
Open the corresponding cover in the recess of the handle.
Turn the bulb holder to the left and pull it out.
The incandescent lamp is easy to press into the socket.
Insert a new bulb into the socket and fix it by turning to the right.
Insert the bulb socket into the headlight and lock it by turning to the right.
Close the lid.
License plate light
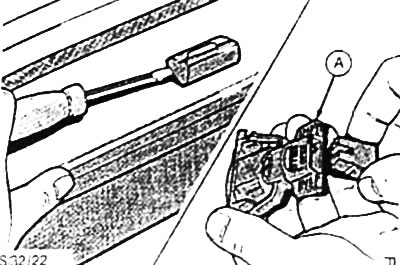
Use a screwdriver to unfasten and remove the lamp housing from the bumper cover.
Turn bulb holder -A- to the left and remove.
Remove the bulb from the holder.
Attention. The lamp is inserted, not screwed in.
Insert a new bulb into the holder.
Insert the holder into the lamp body and fix it by turning to the right.
Press the lamp housing into the bumper cover.
Visitor comments